
Suspension 201: Basic Setup
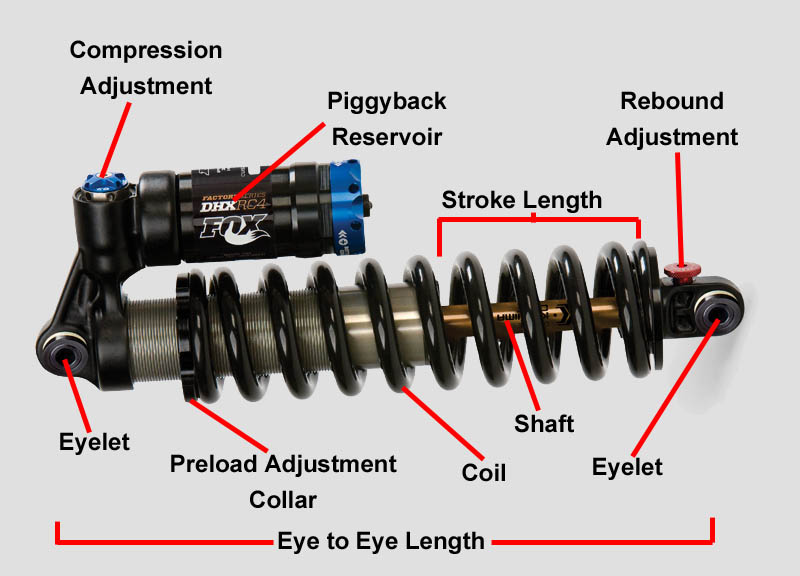
In our initial 201 article, we discussed the anatomy of a suspension system. If you want to learn the basics of how to make the various elements of that suspension system work to maximize both performance and comfort, this article is for you.
Keep in mind: if you’re unclear about any of the terms in this piece, you can check out our Suspension 101 articles on basic definitions and frame designs.
Setting Your Sag
The first thing to set on both your front and rear suspension is your sag.
Sag is the amount the shock compresses from your weight on the bike. A bit of sag helps the suspension work well over smaller bumps—the point of suspension is to keep your wheels on the ground, and bumpy terrain comes in the form of both positive bumps (like a root) and negative bumps (like a small hole).
If you don’t have any sag, the fork might absorb the root, but it won’t let the suspension extend slightly so that your wheel dips into the hole.
To some extent, sag is a matter of preference. All other things being equal, the more sag you have, the softer your suspension will feel. Cross-country racers who are concerned with climbing efficiency over comfort might set their bikes up with less sag than a trail rider.
- Rear Sag: Coil v. Air
Setting sag on a rear shock is relatively straightforward. Many frames will have a recommended amount of sag, usually expressed as a percentage. If the frame doesn’t have a recommended amount of sag, somewhere around 25% is usually a good starting point.
Many rear air shocks have a little rubber band on the shaft. If yours doesn’t have one of these, put a small zip tie around the shock’s shaft.
Coil shocks are a bit more difficult to work with. It’s tricky to get a zip tie around the shaft with the coil in the way. Most coil shocks have a rubber bumper at the far end of the shock shaft. Push that rubber bumper toward the opposite end of the shaft, then use it to measure sag with the method described below.
- Setting Rear Sag
To set your rear shock sag, climb on your bike and get into “riding position.” That generally means standing up with your weight centered over the bike.
And keep in mind that sag is based on your weight. If you usually ride with a full Camelbak, go ahead and strap that on along with your other riding gear so your sag will be set for your “riding” weight.
Either have a helper hold your bike with you on it, or lean the handlebars up against a wall. Now bounce a few times to make sure the rear shock settles into its “sagged” position. Without shifting your weight, reach down and slide that rubber band or zip tie all the way up the shaft of the shock (or get your friend to do it).
Gently climb off the bike and measure how far down the rubber band or zip tie sits. That’s how much sag you currently have.
To turn that measurement into a percentage, just divide the measurement you took by the stroke of the shock. If you don’t know the stroke of the shock, you can just measure the shaft length.
If you’re already at the right amount of sag, then you’re done. If you’re not at the right amount of sag, you need to make the spring stiffer (if you need less sag) or softer (if you need more sag).
On an air shock, this is easily accomplished by adding more or less air. You’ll need a high pressure shock pump for this, and I’d recommend going in 10psi increments until you get into the right ballpark, then fine tune it from there.
If you have a coil shock, you can adjust your sag by adjusting the preload on the spring. The spring is preloaded by turning the collar that the spring butts up against—by turning that collar, you’re compressing the spring. Preloading the spring will adjust how much force it takes to initially compress the spring (and thus adjust the sag).
- A Note on Spring Rate
A common misconception is that the preload adjusts the spring rate. It doesn’t.
A 400lb spring will still be a 400lb spring, no matter how much preload you put on it. What preload does is adjust the force required to initially make the spring move.
Essentially, preload means that the spring is pushing outward on the shock before the shock has even started compressing. To make the shock start to compress, you have to overcome that preload force. The more preload force there is, the more force you have to exert on the shock to get it to move. So basically, more preload means less sag.
When setting preload on a coil shock, you always want to keep a minimal level of preload on the coil to keep the coil from rattling around when the shock is uncompressed. If you’re down less than one turn on the collar from where the spring rattles and you still don’t have enough sag, you probably need a softer spring rate. On the other hand, if you find that you have to put three or more full turns of preload on the coil to get the proper sag, you probably need a stiffer spring.
- Front Sag
Setting sag on a fork follows a similar process as setting sag for the rear shock, but it’s much more focused on feel. There isn’t any set amount of sag that is “correct” for front suspension—the desired sag will largely be dictated by your riding style and the terrain. Somewhere between 15% and 25% will feel right for most people.
Follow the same process as you did for the rear shock. Gear up, stand on the bike with your weight centered, and bounce a couple of times. Now have a friend slide that rubber band or zip tie all the way down the stanchions, and gently climb off the bike. Measure your sag, and, on an air fork, add or remove air as needed.
On a coil fork, you can add or remove preload via the preload adjuster. If your fork doesn’t have an external preload adjuster, that means you’ll need to add or remove spacers to achieve the proper preload.
Most forks don’t come with those spacers, so you may need to consult your local shop for this sort of adjustment (and a word of warning—not many people with non-adjustable coil forks take the time to dial in their preload, so a request for preload spacers might get you some odd looks at the shop). As with a rear shock, too much preload usually means you need a stiffer spring.
Setting the Damping
There’s a lot of personal preference when it comes to damping. I know riders who set up their rebound (and compression) damping quite differently than I do. The following is a rundown of how I set my suspension.
- Rebound: Rear Shock
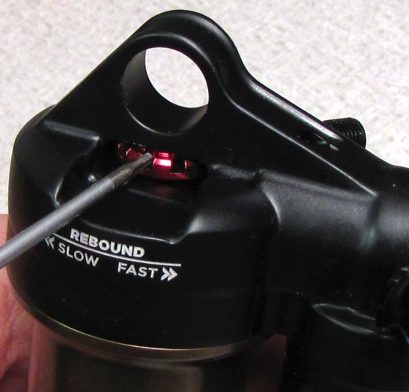
Adjusting the rebound damping on a rear shock will keep it from being too “bouncy.” Start the adjustment by turning the rebound setting, so it’s as fast as it will go. Now go find a curb, and ride down it at a medium-slow speed while seated. The rear shock will compress when you drop off the curb, and the suspension will likely continue to bounce for a little bit.
The goal here is to get the rebound set so that the suspension only bounces once. You should drop off the curb, the suspension will compress, decompress, and then settle back into its sagged state. You don’t want any further “bounce cycles.”
Adjust the rebound knob one click (or ¼ turn) at a time until you get to this point. It’s important to start from the fastest setting and dial it in until you reach the ideal point—you want the fastest setting that doesn’t yield more than one bounce.
When you hit the trails, you might need to fine tune the rebound to get it to feel like you want it to, but this quick test should get you in the right ballpark.
For the next in the series, you guys should cover how to tune suspension for different feels and highlight what you gain and what you lose whith each… such as… How do I tune suspension for the maximum pop off of lips, rollers and other features? Or how do I tune suspension for maximum plush, irreguardless of how it might pedal? Or what do I do to tune the suspension if big hits feel too harsh? Usually people have a goal in mind when tuning suspension, but don’t really know what knobs to turn, to get closer to that goal. What is really needed is a goal-to-knob-turning tranlsation guide.
Great articles to quickly get me up to speed on the basics of suspension design, terminology and tuning. I have been looking for a new full suspension bike for the last few weeks. I haven’t bought a new bike in over 20 years and it’s a little overwhelming. Your articles really helped.
Thanks!
These 101 and 201 articles are brilliant–thanks! So much good info–for example, I had no idea that the dumbed-down C,T,D were specifically compression damping adjustments.